Aged old "superfoods" and their relevant benefits


Whilst the term “super food” has only entered into social circulation during the past few years. The idea of super-nutritious and life giving foods have been around since the beginning of time.


It's very much likely that our ancestors were far more educated about what true superfoods are as we evidently wade through supermarket aisles picking up cans, boxes, prepackaged and processed foods. But in the age of information, you can compile a good list of superfoods for your next shopping trip.


There are foods that have been around for centuries, even millennia. Many of these foods are just as good now as they were then. So which foods should be on your superfoods list? Here are some timeless superfoods that you should include in your diet today:
  • Quinoa - you’ve likely heard of it because it’s experienced a growing resurgence in the past few years. But, quinoa has been around for ages. The Incas of South America refer to this food as chisaya mama, or the mother of all grains. It’s high in protein, calcium, and iron, and is very versatile. Cook with herbs and diced veggies or form with legumes and seasonings into veggie patties. Due to it’s high protein content, it's great in assisting with a high protein vegetarian diet. It can be used as a natural remedy for hair loss and hair thinning.
  • Spirulina - is an algae that is rich in protein, vitamins, minerals, and antioxidants. It is said to be one of the oldest life forms on earth and has been eaten as long ago as the 9th century in the Kanem Empire of Chad. It’s good for your eyes, your skin, allergies, and stabilizing blood sugar.
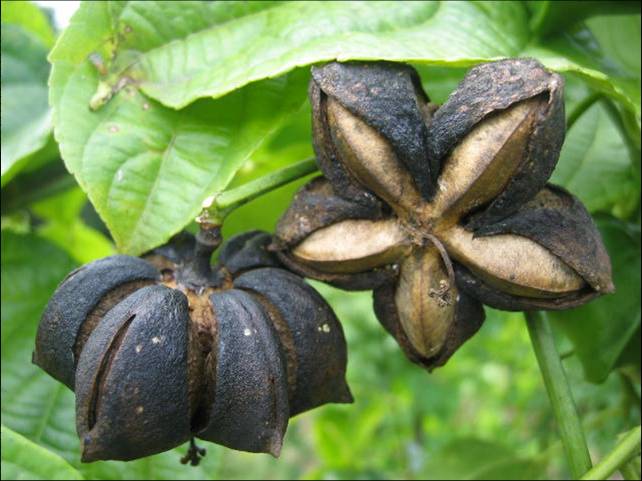
  • Sacha Inchi - This food is a little more obscure... But has been consumed in the Amazon jungle for ages. It’s considered a superfood of the ancient Incas and is reported to contain concentrated Omega-3 fats. It’s also rich in iodine, and vitamins A and E.
  • Maca - Another ancient Incan superfood, Maca can be found in the mountains of Peru. It’s said to be an excellent all-natural energy source and also contains numerous plant sterols, iron, magnesium, calcium, potassium, and iodine.
Let’s not forget other amazing superfoods like turmeric, ginger, honey, garlic etc. All these edibles help fight cancer and protect you against numerous infections and diseases.

How can you prepare these foods? While quinoa is easy to find and super easy to cook. The others may be more of a challenge. Both spirulina and maca supplements can be conveniently purchased at most health food stores. Sacha Inchi can be found in an oil form which can be used on salads as you would use olive oil.

The ancients knew a thing or two about natural living. As we probably would as well in the absence of modern agriculture and readily available food. With trial and error you would soon learn the benefits of each and every individual type of edible. On this bases the majority of the food they consumed would be classed as superfoods. Of which you should try and add to your shopping list!


Get 10% sitewide when you shop at Access Hydroponic. Valid until November 2013!

The Winter Garden

As the seasons progress and the cold winter months unavoidably approach. The life so abundant in the natural world is slowly brought to a steady halt in the winter garden.

While you may not think so, there are still plenty of things you can do in your vegetable garden even during winter. The most important of all being, preparation for next year.

With the coming and perhaps already present winter. Gives us time to sit back and recollect over the previous growing season. Considering our mistakes, new discoveries made, preferable changes for next year, new ideas that we may want to implement. Also considering things like crop rotation, what you may want to grow next year, what seeds to order etc.

Below you can find a few pointers consisting of things to keep you busy during the winter. Hopefully ensuring a greater success for your vegetable garden come next year as well.


Enriching your soil with compost is important. There is quite a bit of physical labour that can be done and is recommended during or just before the cold months in the winter garden. Many others including myself spread manure or well rotted compost around our plot as this will be broken up by the many insects and elements during your absence leaving you with rich fertile soil come spring. Some people choose to dig fairly deep trenches, filling them with vegetable waste and soft mulch such as leaves, shredded paper etc. This will also be broken down and can work in your favour by enriching the soil gradually however it's probably most best to use compost that's already primed for use.


Get out the seed catalogue. Unless you have stockpiled seeds from your previous crops or you have generous seed donators. Now is a good time to reach for your seed catalogue. If you haven't got a catalogue you can easily request one online from one of the many reputable seed bank companies. Or more simply, just order your seeds online.

I always tend to have bags of seeds left over from last year. However I'm always trying new and different strains in my vegetable garden. There are so many varieties of one vegetable. I enjoy experimenting, growing and tasting them all.

It is wise to choose disease resistant varieties when buying your seeds though. It will definitely prove worth while in comparison to a crop that would be susceptible to such a disease if you had not used a resistant variety.


Thinking about crop rotation. Crop rotation, if you didn't already know, is a method for reducing the probable build of diseases within the soil and to also replenish and rejuvenate your soil by planting different crops in different places every other year.

For instance, if you planted potatoes in one bed last year it would be wise to plant a legume or a brassica in the same spot the following year. Crop rotating generally occurs in 4 year periods, this however can be extended to introduce 6 or event 8 yearly crop cycles. I like to keep it simple with my limited space though. I've included a simple chart to the right.

If you like to grow numerous different vegetables in one single bed like I do. You can still rotate your crops by again, following the chart above. Last year I grew my broad beans fairly close to my potatoes so this year , in that same bed I will grow either brassicas or alliums.

Some say it's still safe to grow one vegetable in the same spot consecutively for a minimum of three years and then attempt rotating crops. I've never tried this personally as I'm always moving things around but it sounds reasonable.


Thinking ahead is important. As with all things, your garden will see great benefit from previous thoughts on preparation put into motion. This could be anything from crop rotation, wanting to plant new and interesting strains, switch out old methods for new ones in light of new ideas etc.

As for me, I will be making greater use of my space next year by trying to grow large rows of peas up my garden fence, both in the back garden and out front. I will also be introducing many more containers for easy vegetable growing, expanding my raise beds, building a more aerated, open and spacious compost bin as well as a new polytunnel.

These are just little changes I want to make as I'm pretty satisfied with my results so far. Although given the space, I'd be doing things a lot more differently. But that all depends on your circumstances. What's important is you find the time now to think about the coming year.


Cleanliness is next to godliness. If you want to prevent the build up of nasty diseases and parasites it's wise to clean the majority of your garden instruments. I'm not implying you take your garden fork in the shower with you but giving your pots and seed trays a good wash definitely helps prevent the build up and probability of such diseases.


As a final note. There crops that can persevere through the cold in the winter garden. This year I will be leaving out my winter cabbage which will be done come next spring. Hopefully. Besides cabbage you can grow leeks, garlic, brussel sprouts, you can even grow some strains of legume. There are many late varieties of many other vegetables on the market that you can grow prior to winter. However, you won't be able to harvest very much until the frost has finally departed and weather tilts to something a little bit warmer.

How do you grow potatoes; Grow potatoes from potatoes

The potatoe, with it's high levels of starch, as well as being rich in many other healthy vitamins and minerals, being fibrous with it's staple carbohydrate content, makes it a great vegetable for filling you up easily and giving you lots of energy. As well as being so easily growable in any space big or small, leaves you little reason not to attempt growing it yourself!

The vegetable part that we consume is grown as a tuber on the perennial plant Solanum tuberosum. As the name implies it is a tuberous plant which means that by it's structure it naturally creates enlarged stores of nutrients called a tuber or tubers within the soil. In this particular instance those enlarged stores are the savory and nutritious parts we consume. The tubers are mainly produced to prolong the plants life through the tough seasons. As it's top foliage will inevitably die back. It's tubers beneath the ground survive and with their stored energy from the previous growing season will re-sprout come the following spring. This is why your gone off, old potatoes start to produce those weird prickly, spiky things. Those are the new shoots attempting to resprout with the energy stored in the potatoe from whence they were grown.

The potatoe is a fairly hardy plant, by this what is meant is that it can survive quite a lot of damage from pests or the elements etc and still produce a decent crop. Although this doesn't mean damage caused won't reduce overall yield. It's because of this characteristic I encourage most folks to try growing potatoes. In my garden they flourish like weeds. Sometimes it's hard not to grow them!

How do you grow potatoes? Well by far, the easiest most practical and productive way of growing potatoes is in large containers or big planters. They grow just as well in the ground or in raised beds however they're far more easier to care for and maintain and also to harvest when grown within containers. For some reason using containers to grow potatoes has always given me a bigger yield as an additional result.


Preparation


How to grow potatoes from potatoes. To begin, you will want to firstly chit your potatoes. Chitting a potatoe simply involves encouraging an old potatoe to sprout once again. Exactly how they would look if you've left them in your cupboard for one too many days! You can of course just use old potatoes if they're showing new shoots. The chitting process doesn't have to be all that scientific and is not essential. People only generally chit their potatoes to get an early start to the growing season and also an early maturing crop. This will occur around January-February for most people. You can of course still plant sprouting potatoes when it's summer.

To chit your potatoes is quite simple. Just place some potatoes in a position with sunlight and good airflow. It's best to use seed potatoes as these are pretty much designed to be planted in the way we want. Although any potatoes can work well. You can buy seed potatoes at any good gardening store or even online.

Once your potatoes are showing new shoots it's time to get them in the ground! I would definitely advocate preparing your soil beforehand though. Personally, I just spread some well rotted compost and worm castings around my chosen spot or within the container I will be using along with adding a non excessive amount of bonemeal or fish blood and bone and then give it a good turn over and mix with the garden fork. If you do use some fertilizer always refer to the instructions given and never overfeed as this can do your plants more harm than good. I would advocate organic only fertilizers as, well, read my thoughts on the use of modern, chemical based fertilizers here organic-farming-vs-conventional-farming. Of course you don't have to bother with preparation all that much, however as potatoes are a particularly nutrient hungry crop it will certainly pay off by giving you an increased yield if you do manage to do it. Nevertheless you can still achieve a moderate yield for your efforts without much preparation. Especially if you're new.


Planting


When to grow potatoes. Potatoes are generally planted anywhere from early spring to early summer. Although it completely depends on your climate. 

If your planting potatoes directly in the ground you will want to firstly dig a hole at least a half a foot down. We do this because as the potatoe is a tuberous plant, the deeper and bigger the root system is the more tubers it will produce thus providing more food for us. Once your hole is dug simply place your sprouting potatoe down into your hole, with the sprouting part facing towards the sky and cover with dirt. Make sure to water every few days. You should start seeing life within 2 weeks. It's obviously more wise to dig a long deep trench and plant a row of potatoes but that all depends on your circumstances. One method people tend to use is to slowly pile dirt around the stem to create a small mound. This increases yield slightly depending on the size of the mound however if you've already planted your potatoes deeply they should produce a good crop regardless. This how others and even you can grow potatoes from potatoes!

If however you wish to grow potatoes in containers as I do then the method utilized is slightly different. The ideal container would be deep enough for a big root system and wide enough for the potatoes big foliage. A container about 2-3 feet high and with a diameter of 2-3 feet would be ideal. If you can't acquire such a container it doesn't matter that much, you can even use something simple like a bucket. What you do use, be sure to drill holes in the bottom to allow water to run off. You won't want dirty swamp water collecting at the bottom of your container!

Begin by filling your container with a thick layer of soil or compost. The layer has to be quite deep, a good few inches depending on your container size but not all the way full, leave the majority of the topside of the container empty. Push your potatoes a few inches into your partly filled container and then cover with another few inches of dirt. Be sure to water every few days. Once the potatoes are clearly producing foliage and have reached a height of at least 5 inches above the soil level you will want to cover the majority of the stem will another layer of compost or soil. Repeat this same process until your container is eventually full to the top with soil. As we're systematically covering the stem of the plant with soil it will continually convert into a root system. As you can imagine, planting potatoes this way will give us very big roots, which will reuslt in bigger tubers and of course, ultimately, an even bigger harvest!


Caring for your potatoes


Potatoes need not much care or maintenance. As they're a fairly hardy crop they can sustain quite a lot of harsh treatment. You shouldn't have to worry to much about weeds with potatoes as their foliage becomes so wide and bushy that it's very hard for weeds to grow beneath. You should never cut back or remove any of the potatoes foliage! It's those big bushy plants that will give you large potatoes. You should however, remove any flower buds that you see. This will force the plant to focus on growing big tubers instead of creating seeds.

You will want to keep your potatoes watered regularly. More importantly so during the first few weeks after planting when the tubers are starting to develop. Watering irregularly will cause the tubers to mature, harden and crack. When you do water, water heavily so the water will soak deep down within the soil reaching your deep rooted tubers.

You may want to give them a feed of some nutrients if you didn't prepare your soil before hand. Liquid fertilizers will do the job although you can find fertilizers in pellet or power form which you just sprinkle across the surface and let the rain break them down.

There's not much else you need do once your potatoes are well established. You may want to keep an eye out for any abnormalities that you may think aren't quite but besides that just let them grow and readily await the...

Harvesting


Harvesting potatoes is really simple. People generally harvest when the potatoes leaves are starting to die back but you can harvest anywhere from 10 to 20 weeks after planting. This is all dependent on how big you want your potatoes, and of course what time of year you planted. For smaller potatoes you can harvest from about 10-14 weeks but if you want larger, more fatter potatoes it's best to wait until around 18-20 weeks.

To harvest simply cut down all of the plants top foliage. Then with a garden fork careful dig down, be sure to keep a few inches away from the base of the plant (To avoid damaging any potatoes) lift, and turnover the soil and start collection 'em spuds! Just repeat this process until you think you've collected all the potatoes you can find. If you do damage any potatoes not all is lost just be sure to eat them that same day. 

For harvesting potatoes in containers is very easy. Just tip the container upside down and rummage around in the soil. This is why I advocate growing in containers. It's so much simpler. 

Storing


Before storing I like to leave them out in the sun for around an hour to allow the skins to harden. They're best stored in hessian sacks (The type of material you see sandbags made out of). Just put them out of the way of sunlight, in a dark cool place and they'll be fine. Remember to remove any potatoes that go green! These can be poisonous!

Well, that's it for my potatoes how to grow guide. I hope you give it a go!